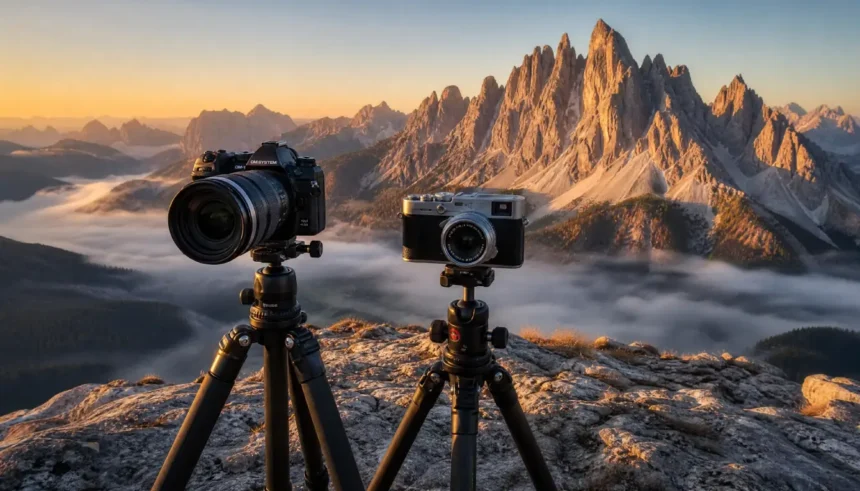
Before touching a dial, you need to see light, not just scenery.
Understanding Light and Weather
Light is the raw material of landscape photography. In 2026, apps like PhotoPills, Windy, and Clear Outside are indispensable. I always check the azimuth and elevation of the sun for sunrise/sunset, cloud cover percentage, and wind direction (critical for long exposures). Golden hour isn’t just the hour after sunrise; the quality of light changes minute by minute. Mid‑day light, often labelled “bad”, can be extraordinary if you shift to black and white or seek contrast and shadow. The key is learning to read weather as a creative brief, not an obstacle.
The Emotional Core of a Landscape
A technically perfect photo of a beautiful place can still feel empty. Ask yourself: What do I feel here? Is it the scale, the solitude, the colour? I often sit for ten minutes without the camera, just observing. That feeling becomes the anchor for every compositional decision. This mindset shift turns a snapshot into a photograph with soul.
Composition Techniques That Transform Your Shots
An OM‑1 or X100VI in the hands of a photographer who understands composition will always outperform a bigger sensor with no eye for structure.
Rule of Thirds and Beyond
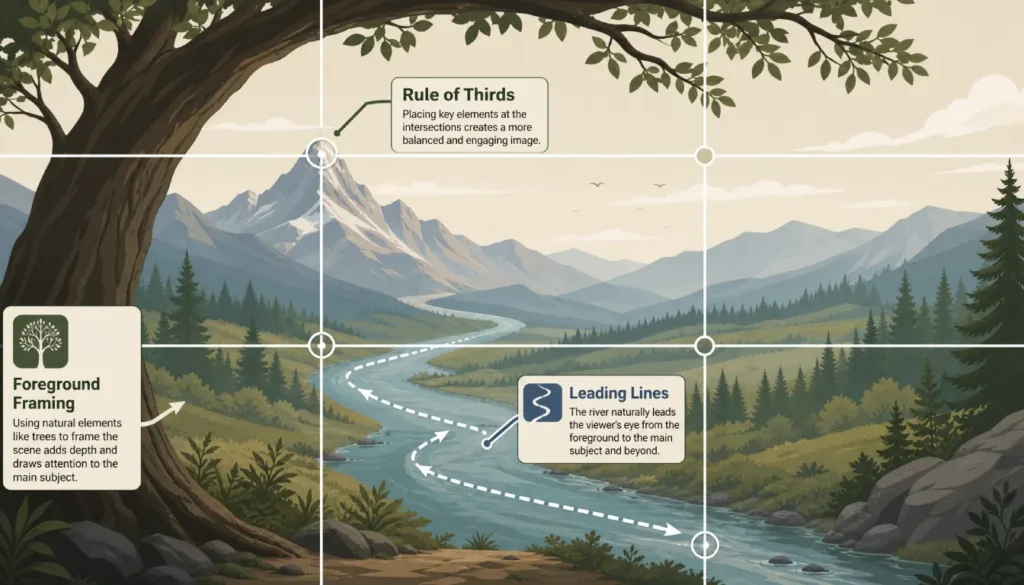
Place the horizon on the lower third to emphasise a dramatic sky, or on the upper third to celebrate foreground texture. But rules are springboards. The golden ratio spiral, balance of visual weight, and intentional space can elevate your image. I often toggle the grid overlay in both cameras – the X100VI’s customisable grid is especially handy for precise alignment.
Leading Lines and Foreground Interest
A winding path, a river, a stone wall – leading lines pull the viewer into the scene. Combine that with a strong foreground element (a striking rock, a patch of wildflowers) to create depth. With the OM‑1’s 7‑14mm ultra‑wide, I can get within centimetres of a foreground subject while still including a sweeping landscape. The X100VI’s 35mm equivalent field of view forces me to find a slightly more distanced foreground, which works beautifully for layered storytelling.
Framing and Layering
Look for natural frames: a tree arch, a cave mouth, a window. They add context and mystery. Layering – foreground, midground, background – gives a three‑dimensional feel. Even on an overcast day, a carefully framed shot of a distant lighthouse through a field of barley can be magical.
Camera Settings: Aperture Priority and the Exposure Triangle
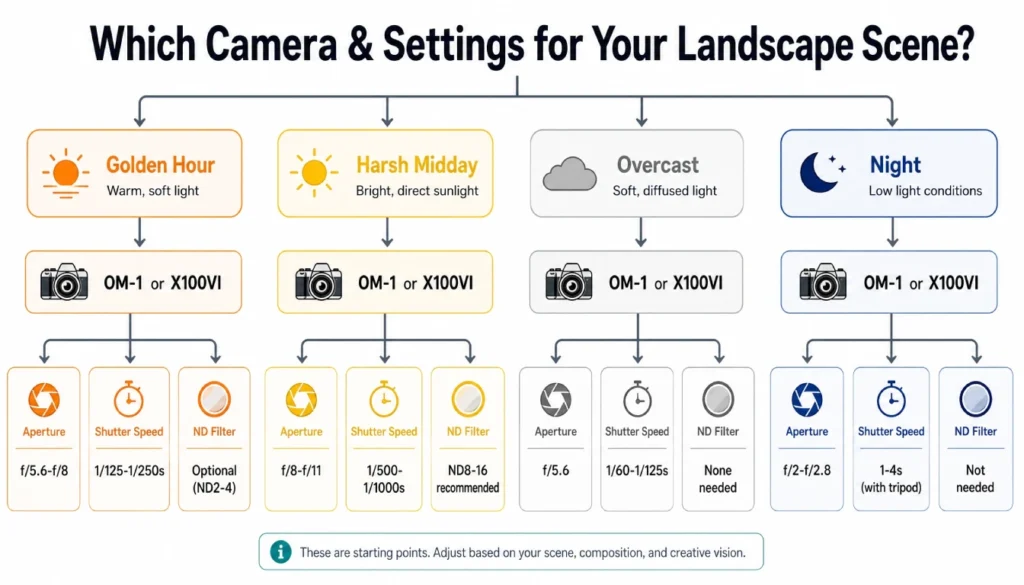
While both cameras are capable of full manual, I live in Aperture Priority mode for 90% of my landscape work.
Aperture, Shutter Speed, ISO for Landscapes
For maximum depth of field without diffraction, I stick to f/8 to f/11 on the OM‑1 (Micro Four Thirds) and f/8 to f/11 on the X100VI. The OM‑1’s in‑body stabilisation lets me hand‑hold at shockingly slow speeds (1/15s at 24mm equivalent is reliable), but for serious landscape, a tripod is non‑negotiable. ISO stays at base (200 on OM‑1, 125 on X100VI) unless the light demands otherwise. I ride the shutter speed, using exposure compensation to protect highlights.
When to Switch to Manual Mode
Manual mode earns its keep in high‑contrast situations like sunrise/sunset, when using ND filters, or when I’m focus‑stacking. I manually set the exposure for the brightest part of the sky, ensure the foreground isn’t crushed, and often bracket three shots one stop apart for safety. Both cameras have excellent exposure bracketing; I’ve programmed the OM‑1’s custom modes for rapid bracketing.
OM‑1 vs X100VI for Landscape Photography: A Head‑to‑Head
Choosing between these two in 2026 is a beautiful creative dilemma.
Sensor Size and Lens Considerations
- OM System OM‑1: Micro Four Thirds sensor, interchangeable lenses from ultra‑wide 7mm to telephoto 300mm (600mm equivalent). Ultimate flexibility for compression shots, long‑lens landscapes, and intimate details.
- Fujifilm X100VI: APS‑C sensor with a fixed 23mm f/2 lens (35mm full‑frame equivalent). This limitation forces discipline and a distinct storytelling style.
Key Landscape Features Compared
| Feature | OM‑1 | X100VI |
|---|---|---|
| Built‑in ND | Live ND (simulated, up to ND64) | Mechanical 4‑stop ND filter |
| High Resolution | 50MP Handheld Hi‑Res / 80MP Tripod Hi‑Res | 40MP APS‑C (no pixel shift) |
| Weather Sealing | IP53 rated | Weather resistant with filter |
| Image Stabilisation | Up to 8 stops (Sync IS) | Up to 6 stops (IBIS) |
| Film Simulations | Colour profiles, Art Filters | 20 Film Simulations inc. Classic Chrome, Acros |
| Live Composite | Yes, for star trails and light painting | No |
Which Camera for Which Landscape Style?
I reach for the OM‑1 when I need technical precision: coastal long exposures, focus‑stacked wildflower macros with a grand backdrop, or high‑resolution mountain vistas destined for large prints. The X100VI comes with me when I travel light, seeking moody street‑meets‑landscape shots, intimate vineyard rows, and dawn cityscapes – its leaf shutter and built‑in ND make candid long‑exposures effortless.
Settings for Different Lighting Conditions
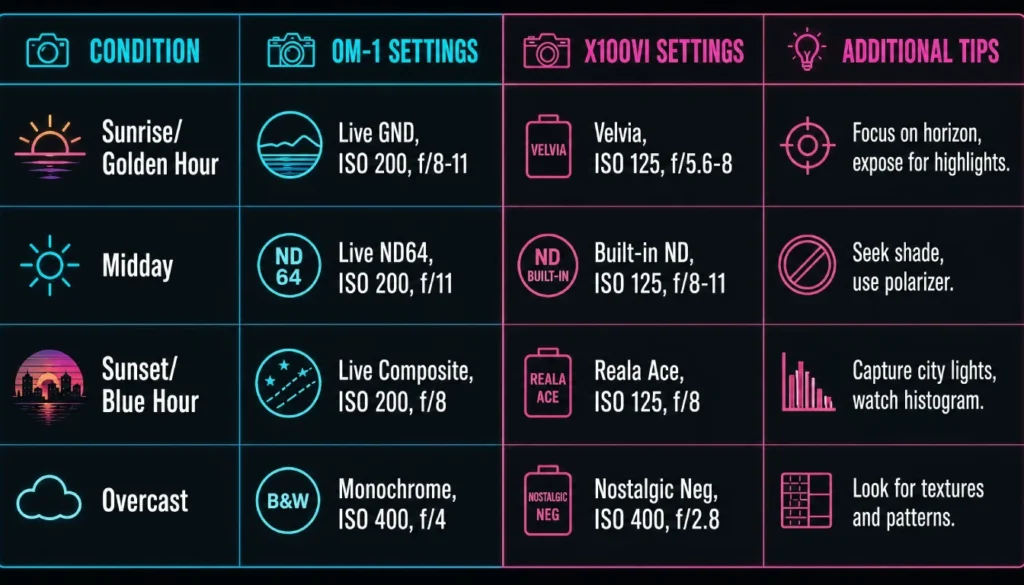
Light dictates settings. Here’s my 2026 field‑tested approach.
Sunrise and Golden Hour
- OM‑1: Aperture f/9, ISO 200, evaluate shutter speed (often 1/4s to 2s). Activate Live ND 2 stops for soft water or clouds. Always bracket ±1 stop.
- X100VI: Aperture f/8, ISO 125, mechanical shutter, built‑in ND on if light is still bright. I use Classic Chrome film simulation to warm the tones naturally.
Tripod essential for both; use a remote or 2‑second timer.
Midday Harsh Light
- Embrace shadows and contrast. Switch to High Contrast B&W on the X100VI (Acros+R) or OM‑1’s Monotone profile. Look for graphic shapes. A circular polariser is your best friend on the OM‑1 to cut glare and deepen skies.
- Settings: f/11, fast shutter (1/500s+), ISO as low as possible.
Sunset and Twilight
- Similar to sunrise, but watch for rapidly changing white balance. Both cameras handle auto WB well, but I often set Kelvin manually (6000‑7000K) to preserve warmth.
- For cityscapes with moving lights, OM‑1’s Live Composite is magical. The X100VI’s smaller form lets me discreetly set up in crowded spots.
Overcast and Moody Days
- Soft, even light is a gift. Perfect for woodland, waterfalls, and intimate landscapes. No ND needed on the OM‑1 if you stop down to f/11; for silky water, 1/2s often suffices. With the X100VI, I’ll use the built‑in ND and Classic Neg film simulation for a muted, film‑like palette.
- Settings: f/5.6‑f/8, ISO 200‑400, shutter speed as needed for motion.
8 Stunning Landscape Photos with EXIF Settings (2024‑2026)
Nothing teaches like real examples. These are images I’ve captured across Europe, with the exact settings that made them work.
1. Dolomite Sunrise, Alpe di Siusi
Camera: OM‑1 | Lens: 12‑40mm f/2.8 at 12mm | Aperture: f/8 | Shutter: 0.5s | ISO: 200 | Filter: Live ND 2 stops | Season: June
The low morning mist needed a slight blur to convey motion. Live ND gave me just enough smoothing without robbing texture.
2. Jökulsárlón Iceberg Lagoon, Iceland
Camera: X100VI | Lens: 23mm f/2 (built‑in) | Aperture: f/11 | Shutter: 1/8s | ISO: 125 | Filter: Built‑in 4‑stop ND | Season: March
The fixed lens forced me to physically move until the iceberg and reflections aligned. The ND allowed a slow enough shutter to streak the drifting ice.
3. Val d’Orcia, Tuscany
Camera: OM‑1 | Lens: 40‑150mm f/4 at 60mm | Aperture: f/8 | Shutter: 1/160s | ISO: 200 | Filter: Circular polariser | Season: September
Using a telephoto to compress the rolling hills and cypress trees. The polariser intensified the green and blue.
4. Glencoe Waterfall, Scotland
Camera: OM‑1 | Lens: 7‑14mm f/2.8 at 7mm | Aperture: f/11 | Shutter: 2s | ISO: 64 | Filter: 6‑stop ND (square) | Season: May
Ultra‑wide made the waterfall look towering. 6‑stop ND turned gushing water into silk. Tripod in the stream, wellies mandatory.
5. Seine River at Sunset, Paris
Camera: X100VI | Lens: 23mm | Aperture: f/8 | Shutter: 1/30s | ISO: 400 | Film Sim: Classic Chrome | Season: November
Handheld, leaning on a bridge railing. Classic Chrome added a muted, cinematic feel. The 23mm field of view perfectly framed the river and architecture.
6. Winter Fjord, Norway
Camera: OM‑1 | Lens: 12‑40mm at 15mm | Aperture: f/9 | Shutter: 1/60s | ISO: 400 | Filter: None | Season: February
Snow and low light required ISO 400; IBIS handled the rest. I overexposed by +1 EV to keep snow white, then pulled highlights in post.
7. Lavender Fields, Provence
Camera: OM‑1 | Lens: 12‑45mm f/4 at 25mm | Aperture: f/8 | Shutter: 1/250s | ISO: 200 | Filter: Polariser | Season: July
Polariser eliminated sheen on the lavender and darkened the sky. Focus on a leading row of flowers.
8. Charles Bridge Dawn, Prague
Camera: X100VI | Lens: 23mm | Aperture: f/5.6 | Shutter: 1/15s | ISO: 800 | Handheld | Season: April
Pre‑sunrise light, no tripod allowed on the bridge. IBIS earned its keep. Acros film simulation added mood. The high ISO grain was part of the aesthetic.
ND Filters: Why and When to Use Them
Even with built‑in options, external ND filters offer more control.
Types of ND Filters
- 3‑stop (ND8): Slight motion blur in water, wide apertures for shallow depth of field in bright light.
- 6‑stop (ND64): Water and cloud blur, 1‑4 second exposures during daylight.
- 10‑stop (ND1000): Extreme long exposure, smoothing oceans, removing people.
Calculating Exposure with ND Filters
I use the PhotoPills exposure calculator or simply multiply the base shutter speed: a 10‑stop filter turns 1/60s into 16 seconds. Always compose and focus before attaching a heavy ND, especially on the X100VI’s threaded adapter.
ND Filter Recommendations for OM‑1 and X100VI
- For OM‑1: Nisi 100mm square system works on multiple lenses. Breakthrough Photography X4 screw‑in for travel.
- For X100VI: you need a 49mm adapter ring (Fujifilm’s AR‑X100 or a third‑party) to mount a 49mm ND. I carry a 3‑stop and 6‑stop from Kase. The mechanical shutter and leaf design make it unusually good for long exposures with minimal vibration.
Mastering Foreground and Background Framing
Depth is what separates a flat snapshot from an image you can walk into.
Creating Depth with Foreground Elements
Look for something close – a textured rock, colourful flowers, a swirl in the sand. Get very low with the OM‑1’s flip‑out screen. Use a wide aperture? No, stop down to f/11 and focus one‑third into the frame to keep both foreground and background sharp. The X100VI’s 35mm equivalent will render foreground objects with a slightly more intimate, human‑eye perspective, which I love for environmental storytelling.
Using Natural Frames to Guide the Eye
An overhanging branch, the mouth of a cave, an archway – these hold the viewer’s attention and direct it into the main subject. In 2026, I’m deliberately looking for frames that incorporate seasonal elements: a canopy of cherry blossoms in Kyoto (yes, Europe has great blossoms too, like Bonn’s cherry avenue) or a snow‑draped pine branch.
Seasonal Landscape Photography Considerations
Seasons aren’t just backdrops; they demand different approaches.
Spring
- What to shoot: Blossom tunnels, fresh green woodlands, bluebell carpets.
- Settings: Soft light lets you shoot wide open for dreamy bokeh. Watch for sudden rain – the OM‑1’s weather sealing is a lifesaver. X100VI with a protective filter.
- 2026 tip: Check local blossom calendars; climate shifts mean earlier blooms.
Summer
- What to shoot: Golden fields, dramatic storm clouds, sunset over lakes.
- Settings: Harsh midday light requires a polariser and careful exposure. Thunderstorms at dusk yield incredible light; be ready to bracket fast.
- 2026 tip: Southern Europe heatwaves may alter typical photo hours; plan for very early mornings.
Autumn
- What to shoot: Vineyards, forests in colour, misty mornings.
- Settings: The X100VI’s film simulations – Velvia for punch, Classic Chrome for mood – can almost eliminate post‑processing. The OM‑1’s colour profiles also benefit from a +2 saturation and slight WB shift towards amber.
- 2026 tip: The Dolomites and Transylvania are peak‑season hot‑spots; book accommodation early.
Winter
- What to shoot: Minimalist snowscapes, frozen lakes, stark trees.
- Settings: Exposure compensation of +1 to +2 stops prevents grey snow. Keep spare batteries warm in an inner pocket.
- 2026 tip: Northern Scandinavia and the Faroe Islands offer reliable snow and low tourist density.
Post‑Processing Workflow for Landscape Photos (2026 Edition)
I’ve refined this over thousands of images; it respects the scene while embracing AI where it helps.
RAW Development Basics
- Lens corrections, chromatic aberration, and level horizon first.
- Global exposure, contrast, white balance. I slightly underexpose in the field to protect highlights, then lift shadows.
- Curves and HSL adjustments for colour harmony.
AI‑Powered Enhancements in Lightroom & Topaz
2026’s Lightroom AI masking is incredibly precise: one click to select the sky, foreground, or subject. I use it for subtle dodging and burning. Topaz Photo AI handles noise reduction and sharpening without artifacts, perfect for high ISO shots from the X100VI or cropped OM‑1 images. The new super‑resolution upscaling lets me print large from the 20MP OM‑1 files. I always ask: Does this enhance the truth or fabricate it? I never replace skies entirely – only refine what was there.
Preserving a Natural Look
My rule: if an edit screams “processed”, I dial it back. Vibrancy over saturation, clarity used gently. The goal is to make the viewer feel what I felt, not to show off editing tricks.
Best European Landscape Locations for 2026
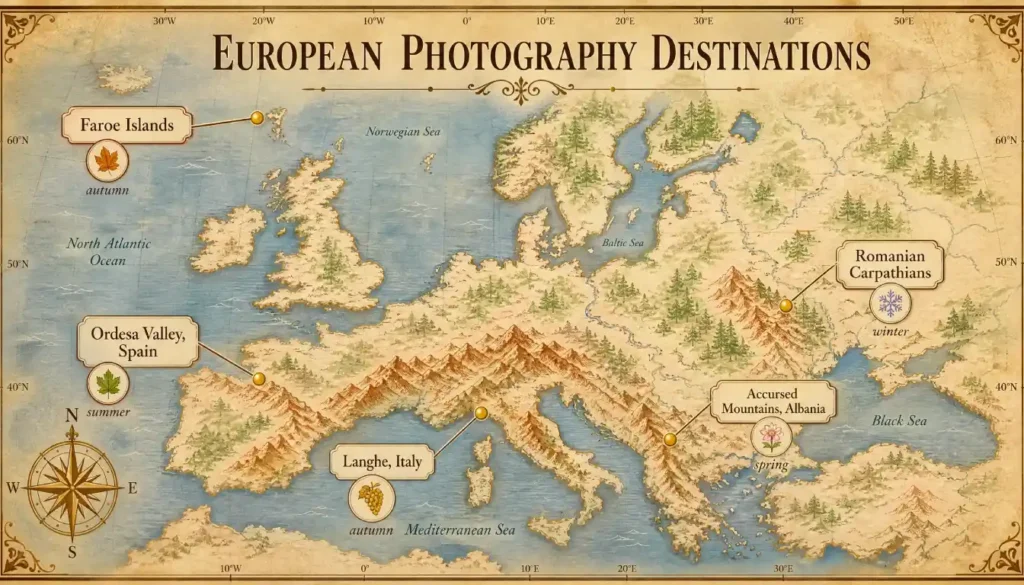
Travelling responsibly and finding fresh perspectives is more important than ever. Here are my top picks for 2026, balancing iconic beauty with emerging gems.
- Accursed Mountains, Albania – New trails and eco‑lodges make this a 2026 hiking‑photography paradise. Spring for wildflowers, autumn for gold.
- Ordesa Valley, Spain – Often overshadowed by the Dolomites, but offers immense limestone cliffs and brilliant autumn colours with fewer crowds.
- Faroe Islands – New direct flights from more European hubs in 2026. Go in May for green cliffs and puffins; always carry rain gear.
- Romanian Carpathians – Bear‑watching and pristine alpine meadows. Photo tourism is growing, so 2026 is the year before it gets too busy.
- Langhe Wine Region, Italy – Rolling hills, medieval towns, and misty November mornings. Perfect for the X100VI’s intimate storytelling.
Common Landscape Photography Mistakes and How to Avoid Them
- Ignoring the Histogram – Your screen lies; the histogram tells the truth. Avoid clipping highlights and crushing shadows.
- No Foreground Interest – Every great landscape has an anchor. Get low, find a detail.
- Tripod Dependency Without Composition – Just because it’s on a tripod doesn’t mean it’s composed. Refine the frame.
- Forgetting the Edges – Scan all four corners for distractions before pressing the shutter.
- Over‑Sharpening in Post – A tell‑tale sign of AI abuse. Let the lens’s character breathe.
- Not Revisiting Locations – Light changes; a single visit rarely yields the ultimate shot.
Conclusion
You now hold a complete 2026 landscape photography playbook that blends the technical prowess of the OM‑1 with the creative constraint of the X100VI. From reading light and mastering composition to choosing the right settings for any season, you’re equipped to go beyond the snapshot. The best European locations are waiting, and with the practical EXIF examples and ND filter knowledge, you can start creating images that resonate.
Which of these eight locations will you photograph first this year? Drop a comment below, and if you’ve already captured something stunning with an OM‑1 or X100VI, share the story – I’d love to hear it. And if this guide helped, save it for your next trip and pass it on to a fellow photographer.
FAQs
Can I shoot professional‑quality landscapes with the Fujifilm X100VI’s fixed 23mm lens?
Absolutely. The 35mm equivalent field of view forces thoughtful composition and storytelling. Its large APS‑C sensor, built‑in ND filter, and leaf shutter allow techniques like daylight long exposures that many interchangeable lens systems struggle with. Many of my favourite travel landscapes were shot on this camera.
Is the OM‑1’s Live ND as good as a real glass ND filter?
Live ND is remarkably good for ND2‑ND64, producing natural motion blur without colour casts. However, for extreme long exposures (10 stops), a physical ND filter still delivers more predictable results and better image quality, especially in high‑contrast scenes.
What is the single most impactful composition technique for landscape beginners?
Foreground interest. Adding a close, sharp element creates immediate depth and leads the eye into the scene. It transforms a distant view into an immersive photograph. Start by including a rock, flower, or pattern in the bottom third of your frame.
How do I keep my OM‑1 and X100VI batteries working in cold weather?
Keep spare batteries in an inner pocket close to your body. When swapping, warm the fresh battery in your hand for a minute. Power the camera off between shots and avoid using the rear screen excessively. Both cameras perform well down to ‑10°C if managed carefully.
Do I need a tripod for landscape photography if both cameras have great image stabilisation?
For the highest image quality – especially at sunrise/sunset, with ND filters, or for bracketing – a sturdy tripod is still essential. Stabilisation helps in a pinch, but it can’t replace the absolute stability needed for 1‑second or longer exposures and careful composition refinement.