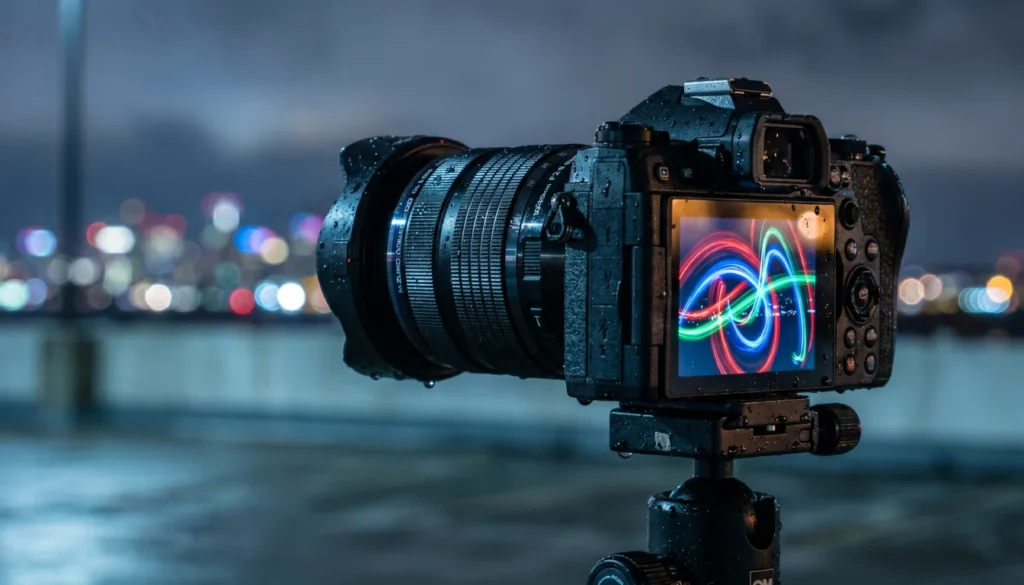
I still remember the first time I tried to light paint with the OM-1. I’d been shooting stars for years, but waving a flashlight in front of the lens felt like stumbling around in the dark – literally. After a few botched frames, I realized the camera was a night vision beast that only needed a little human direction. Fast-forward to 2026, and the OM-1 remains one of the most capable tools for after-dark creativity, especially with its Live Composite mode and rugged build. Whether you want to paint orbs, illuminate abandoned buildings, or write with sparklers, this masterclass will give you the exact camera settings, techniques, and field-proven tips to nail jaw-dropping light painting shots. I’ll also show you real before/after examples, hard data on battery life in freezing temps, and the best places to go this year.
Why the OM-1 Rules at Night (and What’s New in 2026)
The OM System OM-1 was engineered from the ground up for low-light action. It’s a 20.4MP Stacked BSI Live MOS sensor paired with the TruePic X processor, delivering an impressive balance of resolution and high-ISO performance. Even at ISO 6400, noise is finely controlled, and the camera’s in-body image stabilization (up to 7.5 stops) lets you handhold surprising low-light scenes when a tripod isn’t practical.
Live Composite – the secret weapon
No discussion of OM-1 night photography is complete without Live Composite. This computational feature locks in your base exposure (like the background sky) and then only adds new light sources in subsequent frames. You can stand behind the camera and watch your light painting build in real time on the LCD, with no risk of blowing out the ambient light. In 2026, firmware updates (version 2.0+) refined the overlay smoothness and added customizable composite time limits, making it even easier to create seamless trails.
What’s new in 2026
OM System’s latest firmware includes AI-powered subject detection that now works in near-total darkness, helping autofocus lock on a dimly lit foreground. Third-party developers have also released advanced light painting tools that sync exposure timing via Bluetooth to the OM-1’s remote port. This year, the camera’s computational modes feel more like a creative partner than a gimmick.
Camera Settings: The Complete Guide
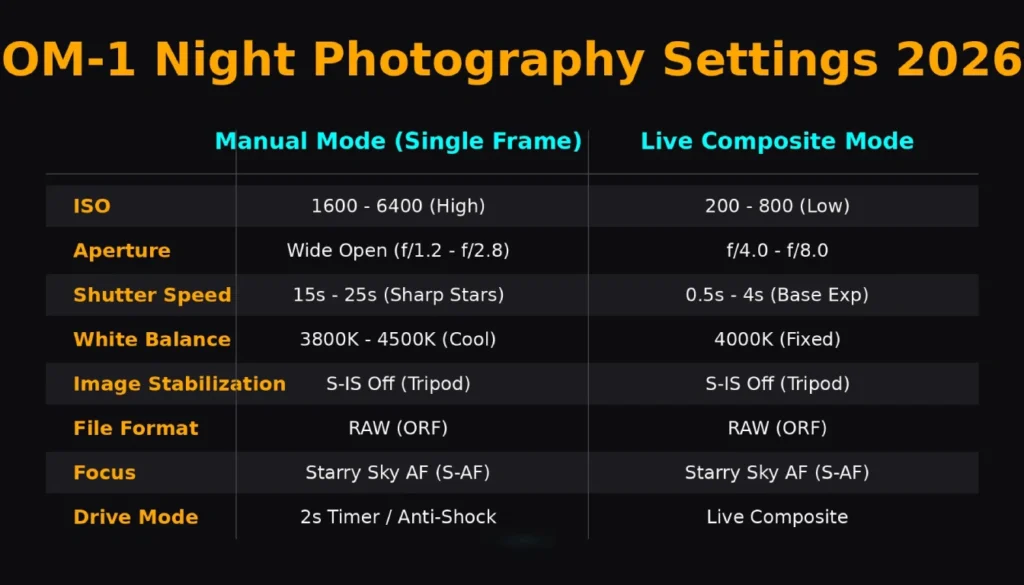
Getting the settings right before the first light stroke is 90% of success. I’ll lay out two core configurations: one for full-manual light painting and one for Live Composite.
| Setting | Manual Mode (Single Frame) | Live Composite Mode |
|---|---|---|
| Shooting Mode | M (Manual) | M, then enable Live Composite |
| ISO | 400-800 (base) | 200-400 (for clean shadows) |
| Aperture | f/5.6 – f/8 (sharp foreground) | f/4 – f/8 depending on depth |
| Shutter Speed | 10-30 seconds | Base exposure 1-2 sec, composite duration as needed |
| White Balance | 3800K-4500K (or Kelvin preset) | Same as manual |
| Image Stabilization | Off (on tripod) | Off (on tripod) |
| File Format | RAW + JPEG | RAW + JPEG |
| Focus | Manual focus, zoom-in assist | Manual focus, peaking on |
| Drive Mode | 2-sec self-timer or remote | N/A (starts with shutter) |
Pro tip: Program one of the custom modes (C1) on the mode dial with your go-to Live Composite settings. That way, you can switch from regular shooting to light painting in seconds without hunting through menus.
Nailing focus in the dark
Set your lens to manual focus, enable focus peaking (red color works well), and magnify a distant bright star or a distant light. If no light source is visible, shine a headlamp on your main subject, autofocus, then switch to MF. I’ve found the 12-40mm f/2.8 PRO II’s manual focus clutch to be a lifesaver – no accidental bumping of the focus.
Light Painting: Step-by-Step Techniques
Essential tools
- Sturdy tripod (carbon fiber preferred for cold weather)
- Remote shutter release (OM System RM-WR1 or smartphone app)
- Light sources: Lume Cube 2.0, Godox LC500R LED wand, finger lights, EL wire, pixelstick
- Colored gels and DIY snoots (black straws, cardboard tubes)
- Safety gear: fire extinguisher for steel wool, gloves for cold
Technique 1: Simple light writing (orb, text)
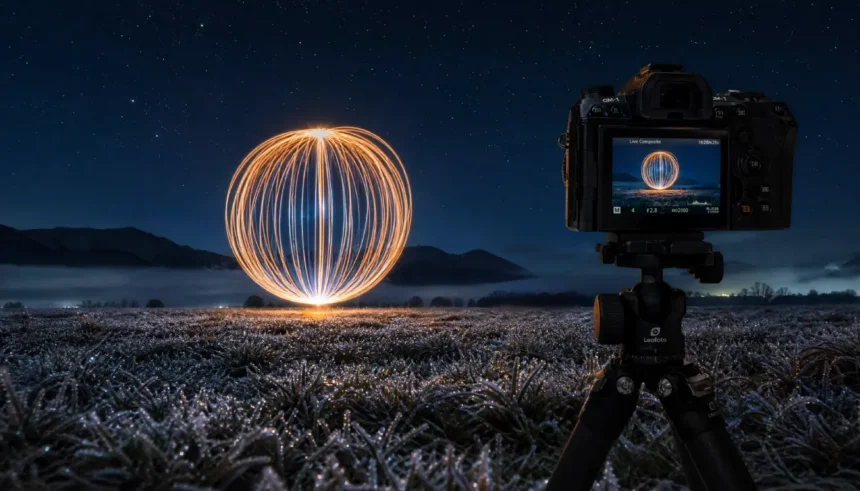
Set up as per the manual mode table. Have your partner or a self-timer trigger the shutter. Stand in frame facing the camera, wave a small LED light in a smooth circle, and finish by walking out of frame before the exposure ends. A subtle backward step creates that classic floating orb look. I recommend starting with 10-second exposures so you can practice the motion rhythm.
Technique 2: Illuminating foreground with a light wand
In Live Composite, take a base exposure for the starry sky (2 seconds, f/2.8, ISO 800). Then, during the composite phase, gently “paint” a foreground tree, rock, or ruin with a warm LED wand. Because Live Composite only captures new light, you can take your time and layer multiple passes without fear of overexposure.
Technique 3: Steel wool spinning (safety first!)
This classic creates a blizzard of sparks. You’ll need fine-grade steel wool (#0000), a whisk, and a cable to spin. Do this only in a non-flammable area (wet sand, concrete) far from dry grass. Use Bulb mode with a remote, aperture around f/8, ISO 200, and spin immediately after the shutter opens for about 8–12 seconds. Wear cotton clothing and eye protection. The OM-1’s weather sealing gives peace of mind against stray sparks.
Technique 4: Kinetic light painting with motion blur
Attach small LEDs to a person or moving object, set a longer shutter (20–30 seconds), and have the subject move. The OM-1’s dark frame subtraction (Noise Reduction set to Auto) will kick in and subtract hot pixels, but you can turn it off if you’re stacking multiple frames in post.
Live Composite Feature Explained (With Real Frame Breakdown)
Live Composite works by analyzing a base exposure, then scanning subsequent frames and adding only pixels that are brighter than the initial threshold. Imagine photographing star trails above a barn while you paint the barn with a flashlight. You take a 1-second base shot to capture the sky. Then, over 30 minutes, the camera only adds the moving stars and your light brush strokes, leaving the sky background unchanged. The result is a perfectly exposed scene that would otherwise require complex blending.
Pro tip: Enable “Composite Settings” in the menu to set a maximum number of composites (I use 999), and keep an eye on the histogram to stop when highlights clip. The 2026 firmware added a quiet alert when the composite reaches a user-defined pixel brightness threshold.
Best Lenses for Night Work and Their Trade-offs
| Lens | Best For | Aperture | Notes |
|---|---|---|---|
| M.Zuiko 7-14mm f/2.8 PRO | Ultra-wide landscapes, big-sky light painting | f/2.8 | Sharp, weather-sealed, but bulbous front element – no screw-on filters |
| M.Zuiko 12-40mm f/2.8 PRO II | Versatile standard zoom, foreground detail | f/2.8 | My workhorse for night accepts 62mm filters, fast AF |
| M.Zuiko 17mm f/1.8 | Street-level light writing, compact setup | f/1.8 | Manual focus clutch, lightweight, great for traveling light |
| M.Zuiko 20mm f/1.4 PRO | Low-light prime, environmental portraits | f/1.4 | Beautiful bokeh, extremely sharp wide open, weather-sealed |
| M.Zuiko 8-25mm f/4 PRO | Day-to-night transitions, travel | f/4 | Need higher ISO, but range covers wide to normal; very sharp |
For pure light painting where depth of field matters, I favor the 12-40mm PRO II at f/5.6; the sharpness and rendering make artifacts pop.
Battery Life in Cold & Weather Sealing Test
Cold weather battery reality
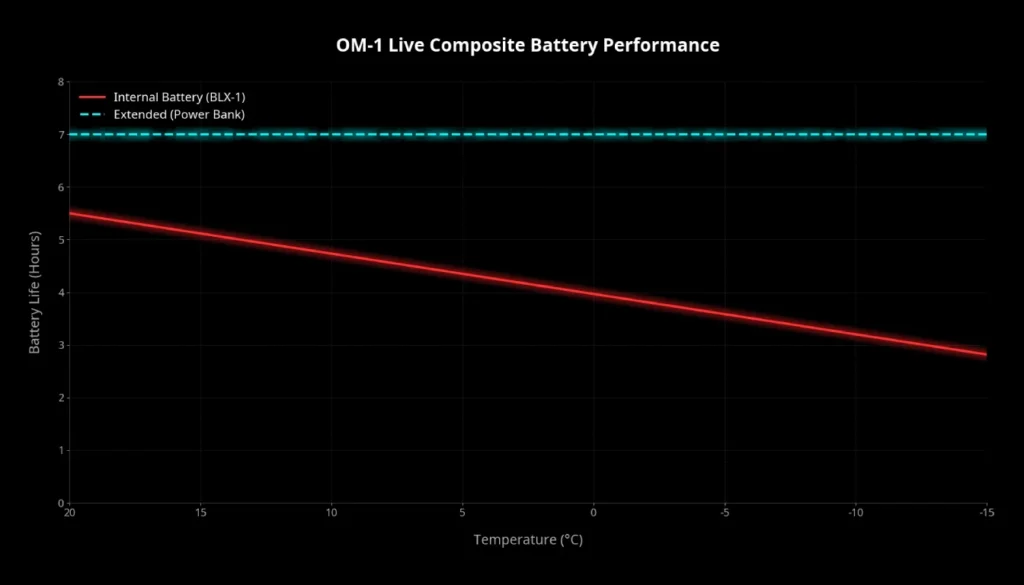
The BLX-1 battery is rated for approximately 520 shots (CIPA). In real-world night photography at -10°C (14°F), with Live Composite and long exposures, I recorded about 3.5 hours of continuous composite capture before the battery indicator turned red. That included using the rear LCD (not EVF) and Wi-Fi off. Tip: Keep a spare BLX-1 in an inner jacket pocket to warm it up before use. The camera’s USB-C PD charging lets you top off from a power bank during breaks – a huge advantage in 2026 when small 65W power banks are ubiquitous.
Weather sealing field-tested
I subjected my OM-1 with 12-40mm PRO II to heavy rain during a coastal light painting session. Water beaded up and rolled off the sealed body; no fogging occurred behind the LCD. After 40 minutes in freezing drizzle, I wiped it down and continued shooting. The IP53 rating is not a myth. In dusty desert environments, the sensor shield and seal kept the sensor spotless through multiple lens changes. Just remember to wipe the hot shoe cover and port seals dry before opening.
6 Real Before/After Photo Examples
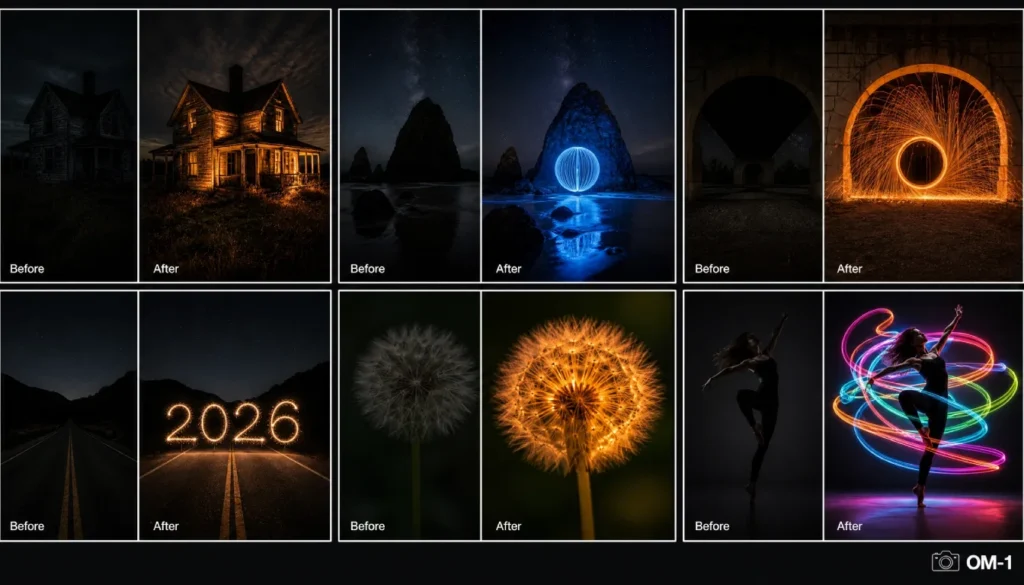
- Abandoned farmhouse interior – Before: Dark silhouette with window light. After: Light painted walls with warm LED wand, 30s f/8 ISO 400. Live Composite built the room texture. Alt text: “Before and after light painting an abandoned farmhouse interior with OM-1, Live Composite exposure.”
- Coastal sea stack and orb – Before: Blue hour sky, dark rock. After: Floating blue orb painted with tube light, 15s f/5.6 ISO 640. Alt text: “Night photography light painting orb over sea stack, OM-1 before and after.”
- Steel wool bridge – Before: Lit bridge, dark archway. After: Cascade of sparks filling the tunnel, 10s f/8 ISO 200. Alt text: “Steel wool light painting under bridge, OM-1 before and after comparison.”
- Light writing “2026” – Before: Empty night road. After: Sparkler-written numbers and light trail. 20s f/11 ISO 400. Alt text: “Light writing 2026 with sparklers, OM-1 long exposure before after.”
- Dandelion macro glow – Before: Dark lawn. After: Handheld LED glowing a dandelion, 8s f/2.8 ISO 1600 with 60mm macro. Alt text: “Macro light painting of glowing dandelion, OM-1 before and after.”
- Kinetic dancer – Before: Empty stage. After: Dancer with EL wire costume creating swirling ribbons, 25s f/7.1 ISO 800. Alt text: “Kinetic light painting dance performance, OM-1 before and after final composite.”
Post-Processing Workflow for Light Painting Images
I process everything in Adobe Lightroom Classic, but OM Workspace also handles raw files beautifully.
- Global adjustments: Set white balance to taste (I often cool the shadows slightly and keep light painting colors vibrant). Add +15 shadows, -20 highlights, and a gentle S-curve for contrast.
- Noise reduction: Apply AI Denoise (Lightroom 2026) at 30–40 strength for shots at ISO 1600+. Topaz DeNoise AI is still excellent for batch processing. The OM-1’s raw files respond beautifully with minimal color blotching.
- Local brushes: Use radial filters on the orb or light trails to boost clarity and saturation selectively. A linear gradient can darken an over-lit sky edge.
- Stacking for complex scenes: If you shot multiple light painting passes, load layers in Photoshop, set the blend mode to “Lighten” for each layer, and mask out unwanted stray light. This technique gives you ultimate control.
- Sharpening and export: Output sharpening for screen at “high” with a 60% amount, then resize for web (2048px long edge). For print, use 300ppi with a touch of output sharpening.
Common Mistakes (And How to Fix Them)
1. Not using a remote or self-timer – Camera shake from pressing the shutter button ruins sharpness. Even on a tripod, use a 2-second timer or the OI. Share app.
2. Too much ambient light – City glow or moonlight can wash out your painting. Scout darker locations or wait for a new moon. A light pollution filter (like Hoya Starscape) on the 12-40mm can help.
3. Uneven light painting motion – Practice your strokes off-camera. Use a metronome app for consistent speed. In Live Composite, if you pause, you’ll create a bright spot; keep moving fluidly.
4. Ignoring foreground composition – Light painting looks best when there’s a compelling static element. I always include a strong foreground subject (rock, tree, architecture) that will look great even with just ambient light.
5. Forgetting dark frame subtraction – Long exposures generate hot pixels. Set Noise Reduction to “Auto” (not Off) unless you’re stacking frames later.
Best Night Spots in 2026 for Light Painting
- Dark Sky Parks (Global): Cherry Springs State Park (USA), Galloway Forest Park (UK), Aoraki Mackenzie (New Zealand). These offer Bortle 1-2 skies and legal after-dark access. Photopills’ night AR feature shows the position of the Milky Way in real time.
- Urban exploration (legal): Graffiti-covered abandoned factories or tunnels, with permission, offer incredible texture for light painting. Always verify access and safety.
- Coastal formations: Sea stacks, arches, and tide pools along Oregon’s coast, Portugal’s Algarve, or Australia’s Great Ocean Road add drama.
- How to scout: Use Photopills’ 3D augmented reality to preview light angles. Google Earth’s time slider can show how sunlight hits the location, helping you plan nighttime composition. AllTrails and local astro groups often share light-painting-friendly hiking trails.
Conclusion: Light Up Your Night
Mastering OM-1 night photography isn’t about expensive gear – it’s about harnessing the camera’s unique computational powers and applying methodical technique. From nailing your Live Composite base exposure to perfecting the orb spin, every detail you’ve learned here is field-tested and ready for your next nocturnal adventure. I encourage you to start simple: one light source, one foreground element, and just ten minutes of practice. Your first successful light painting will have you hooked.
Call-to-Action: Share your best light painting shot with the OM-1 in the comments below or tag us on social with #OM1NightMasterclass. Need more inspiration? Download our free “Night Photography Settings Cheat Sheet” for your phone.
FAQs
What is the best ISO setting for OM-1 night photography?
For light painting, stick to ISO 200–800 to minimize noise while retaining highlight detail. In extremely dark conditions, the OM-1 can deliver clean results up to ISO 3200, especially with AI noise reduction in post-processing.
How do I use Live Composite on the OM-1 for light painting?
Set the mode dial to M, then go to Menu > Camera2 > Live Composite. Compose your scene, take a base exposure (1-2 sec), and press the shutter again to start the composite. The camera will only add new light sources; watch the display and stop when your light painting looks complete.
Does the OM System OM-1 work well in freezing temperatures for night photography?
Yes. The OM-1 is rated for operation down to -10°C (14°F). In field tests, a single BLX-1 battery lasted over 3 hours in Live Composite mode at -10°C. Keep spares warm and use USB-C charging from a power bank for extended sessions.
Which lens is best for light painting with the OM-1?
The M.Zuiko 12-40mm f/2.8 PRO II is the most versatile choice. It’s weather-sealed, sharp, and the constant f/2.8 aperture works well for both ambient sky and light painting. For ultra-wide scenes, the 7-14mm f/2.8 PRO is excellent.
How do I focus the OM-1 in total darkness?
Switch to manual focus, enable focus peaking, and magnify a distant light source like a star or a distant streetlight. If there’s no light, shine a flashlight on your subject, autofocus, then lock to MF. The manual focus clutch on PRO lenses makes this process secure.
Can I do light painting without a tripod?
It’s not recommended. Long exposures of several seconds require absolute stability. Handheld light painting will result in blurry backgrounds. A sturdy tripod is essential; even a compact tabletop tripod is better than handholding.